
Defective Audio Lead Sounds

Lead sounds are one of the key elements that makes a track work. Get it right and it rocks, get it wrong and the track loses kudos.

I don’t claim to know how every riff or lead is made but will go through a few simple sound design techniques that will help you add movement, sonic character and texture to your sounds.
Most of what I’ll explain can be applied to any elements in your track, using a variety of synths and DAWS.
![]()
Sound Design Basics
Let’s start with a few synth concepts. What makes up a lead sound? It’s essentially one or more oscillators and/or samples, playing a riff or sequence of notes. It can be made up from any number, combination or type of oscillator or sample, using varying synthesis methods. Whilst traditionally thought of as a synth line, leads riffs can (in my opinion) also incorporate percussive elements. There are endless possibilities as you know, and most importantly, no rules, just guidelines and imagination.
Notch Lead
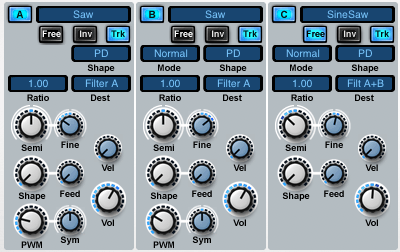
Here’s what we’ll be making, a Saw style lead using a Notch filter and FX. The lead was made using Rob Papen Blue.
And here’s is the same riff in context. Track courtesy of a recent engineered tune for Hard Jeli.
So how was it done?
1.
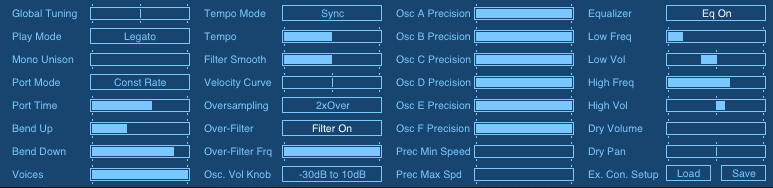
Load Blue up and initialise the patch to zero all controls. This can be done from the Presets menu (clear).
Then dial in a Sawtooth waveform for OSC A. For this lead riff we need some pitch bend control so set the bend amount to 5 semitones up and an octave down. This can be changed depending on the riff you write and the pitch bend you require.
Here’s how it sounds when played in the same riff. I wont go into details for the notation (see attached midi file) but it includes some pitch bend and mod wheel control to add movement.
It sounds pretty good but needs to be bigger, wider, fatter, dirtier etc…
2.
Now add OSC B with the same settings as OSC A but detune them apart 30 cents or so.
3.
Then add some portamento to give it some edge on the note start. This gives each note a spit shape on the beginning as they return from other pitches.
4.
Now add another oscillator. Set OSC C to SineSaw and lower it by 1 octave.
5.
Then the cool bit. Some filters. For this lead we need to set both filters to Notch. Set filter A to 24dB Notch and filter B to 12dB Notch.
Dial in some mod wheel control to adjust filter A up 35% and filter B down 5% when the mod wheel is increased. This will twist the sound nicely.
Add some Q amount to both filters to taste. Around 25% will be fine and a bit of filter distortion for good measure.

We now need to route the oscillators to the filters. Route OSC A&B to filter A and OSC C to filter A&B.
Set the filter mode to Serial so they go one after another in the chain then route filter B output to FX A.
Now we get this!!
6.
Call up the FX tab and add some Stereo Widener and Phaser (25% mix on both so not to destroy any mono compatibility). Check the screen shot for more detail here.
Set the FX routing to Serial.

7.
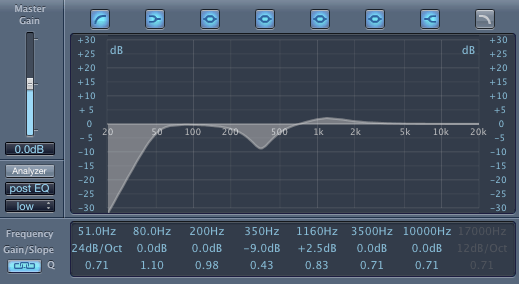
The last stage is just to tuck the EQ in so it sits nicely with our track and add some choice effects to give the riff depth. I used Blue’s built in EQ to reduce the sub and add some top end bite. Then added the Logic Channel EQ to dip the low mids and push out the area I feel I wanted to hear more of.
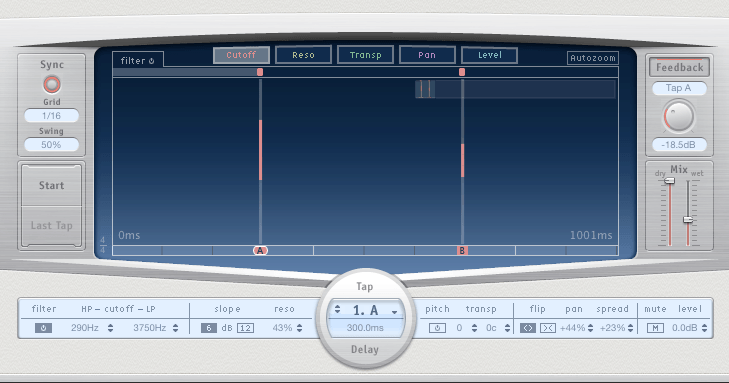
I also added some echo using Delay Designer. The echos were filtered and panned.
Here’s how it sounds with the effects and EQ:
And the riff again in context in the track:
Download the source files here. Includes Blue bank containing patch and the midi file for the riff.